
This is part 2 of 2 on URL filtering. In part 1 we reviewed why URL and domain filtering is so crucial to preventing exfiltration and command-and-control (C2) traffic. While URL and domain (FQDN) filtering has been around the enterprise for a while, filtering egress is a new application for many organizations. In some ways, this is your last line of defense. Let’s review how to implement it.
The challenges of implementing URL and domain filtering in public cloud
Secure egress domain (FQDN) and URL filtering often get ignored in the cloud because traditional methods (a.k.a., NGFWs) make it really challenging. Specifically, cloud network engineers often struggle in two dimensions:
Integrating with a more open and dynamic cloud infrastructure is hard – The cloud is fundamentally different from the datacenter, which makes implementing egress controls more challenging.
- Getting into the traffic path requires a deep understanding of cloud networking constructs
- TLS Decryption and key management is less straightforward in the shared responsibility model
- A more dynamic network environment requires a more agile ability to stay in the path
Getting an NGFW in the traffic path in the cloud requires significant routing changes and cloud networking capability. NGFWs often add latency and integration challenges for TLS decryption in cloud, which is required for URL filtering. Furthermore, using NGFWs also introduces manageability and scale challenges that often result in bottlenecks.
Implementing egress policy is not straightforward – It’s challenging to come up with all the known good sites/domains and URLs in advance to create your custom list of approved ones. And then there’s the issue of how you handle sites and URLs that are not categorized neatly into known categories. Creating and managing policies against different types of workloads (dev vs. prod or regulated vs. non-regulated) and then aligning those egress policies with cloud identity, such as tags, becomes a barrier without the right solution. You also need to couple FQDN with URL filtering when some flows can’t be decrypted.
Valtix has successfully addressed these challenges and enabled URL and domain filtering for our customers. This how-to has been derived from our experience and suggestions from customers.
Implement URL and domain filtering with Valtix in seven steps
Step 1: Enable Valtix in centralized or distributed mode – Depending on your requirements for data to remain local to each account, first decide on a cloud security architecture. Valtix streamlines this process through automated configuration of routing, transit gateways, TLS decryption, and gateway load balancers to enable outbound or inbound traffic inspection through our Cloud Gateways.
Sign up for Valtix Free Tier and use our easy-to-follow documentation. Or contact us for a cloud security architecture consultation.
Step 2: Gain visibility on current egress traffic – before enforcing allow/block policy decisions, observe the traffic flowing with an allow with log rule. Summary and aggregation statistics will provide a baseline on what sites are being accessed and if they are needed. And you might even identify malicious sites that are already being accessed via Valtix’s integrated domain categorization.
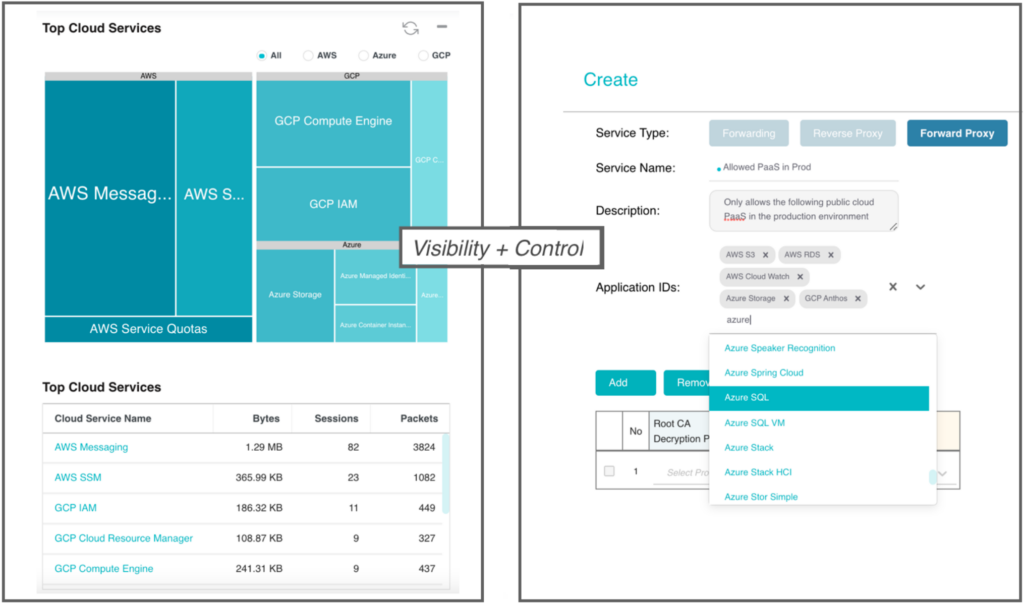
Use Valtix to baseline the environment in order to enable visibility into egress traffic flows and destinations, including PaaS services
Step 3: Build policy, but with allow only – this means that your known and allowed good sites will grow over a few weeks, but you are not blocking anything other than the known malicious categories (usual suspects: phishing, botnets, spam etc).
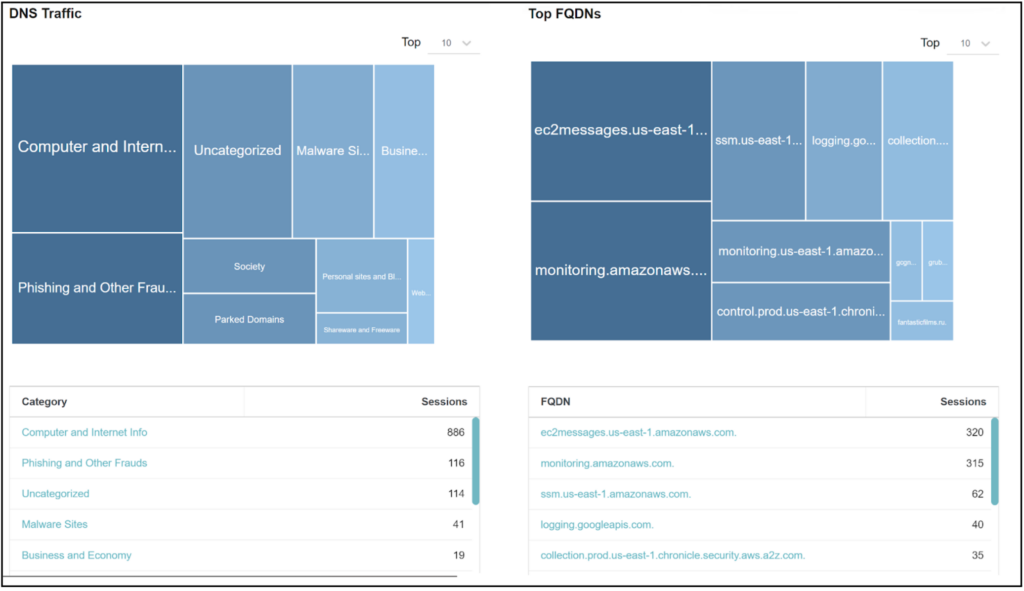
Valtix provides visibility into the domains and categories of your accounts
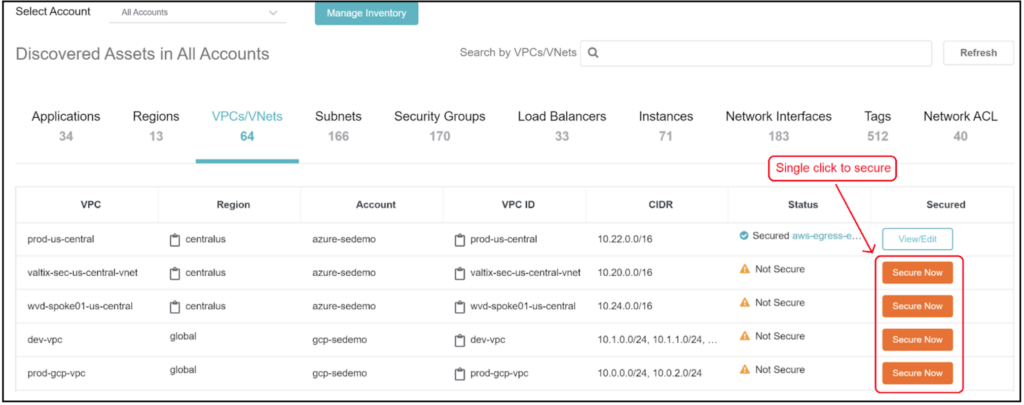
Visibility to all cloud assets with a single click to secure
Step 4: Build generic global policies – As you create a complete set of allowed sites, it is time to group them into general-purpose sites that are needed universally. These would usually sit at the bottom of your policy rules, i.e., if other stricter policies don’t override them, then they continue to apply to your entire cloud environment.
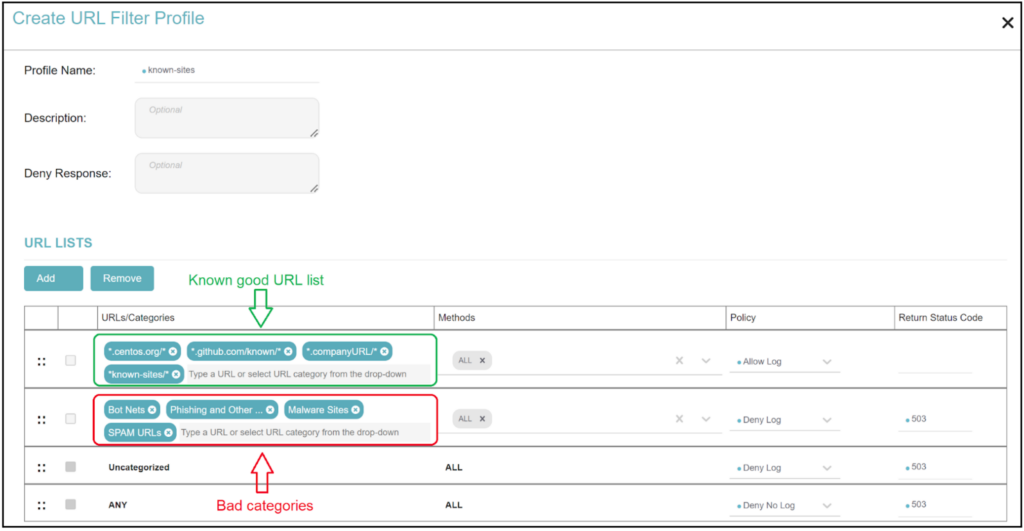
URL profiles allowing known URL list and denying all known bad categories and unknown sites
Step 5: Enforce policy based on each workload’s requirements – While global policies set the baseline, it is difficult to block all other sites without knowing the context of the application or workload (instances, containers etc). Fortunately public cloud environments use tags to provide meta-data on the workload context. These are commonly used for billing, administration and often as part of the DevOps cycle (dev, build, test, prod).
Using these tags on your cloud workloads, the URL and domain filtering can now work extremely granularly on the source of outbound traffic:
- “Linux” tagged systems can connect outbound to your software repository or update servers
- “dev” tagged systems can access your software repo: github.com/myOrgRepo and none others
- “pci” tagged systems can only connect to approved payment processor sites
- “prod” tagged systems can only connect outbound to approved third-party services and partners
Step 6: Add in traffic inspection for threats and exfiltration – URL and domain filtering should not be the only rules applied to secure outbound traffic. To prevent command and control of compromised compute instances, it should be combined with IDS/IPS and antivirus to stop your compute instances from attacking others (i.e., don’t be part of a botnet) and data loss prevention (DLP) to prevent exfiltration.
Step 7: Automate with Terraform – As your cloud security matures, hand-crafting of policy is challenging and lacks version control. Building the URL and domain filtering policies using Terraform and updating them in a controlled fashion offers the benefits of infrastructure-as-code (IaC). This enables you to embed the policy rules as part of your DevOps process as the code goes through build, deploy, and run cycles, with each applying appropriate tags to your workloads and relevant policies applied automatically.
Conclusion
Securing outbound traffic is the most effective way of preventing exfiltration and stopping attackers – whether they started by breaching your Internet-facing applications or moved laterally from another system. Implementing this advanced control at scale is just seven steps away.
P.S. Many customers find self-paced workshops for AWS and Google Cloud helpful to get started using the Valtix Free Tier.